
Table of Contents
How to Make Image Black and White in Photoshop?
To make image black and white in adobe photoshop we use a Black and White Tool option. In this photoshop tutorial we will understand the use of Black and White Tool available in Adobe Photoshop to make image black and white. We will also discuss about different parameters of this tool used to convert an image from colour to black and white.
In some applications we need gray image or black and white image instead of using the color images. Some time black and white images are preferred due to several reasons such as code complexity, difficulty of visualization, speed and color complexity.
If we want to create a dramatic grayscale or sometime duotone effect to the color image then most effective and efficient way to do this is to use a Black & White adjustment layer available in Adobe Photoshop to make image colour to black and white.
This is different from the saturation adjustment. Using this tool we can easily manage the control the way of converting the individual colors into black and white. Using this tool we can emphasize or deemphasize some specific colors and also tonal ranges. This tool also provide the facility to tint the grayscale and we can to do this simply by apply a color tone to the input image for example sepia ton.
In adobe Photoshop we can easily convert a color image to grayscale with Black and White features. Interesting fact a about the Black & White feature is that you have a lot of control over how your colors are converted like a channel mixer.
Process to make image black and white
In Adobe Photoshop we follow the steps given below to make image black and white.
- At first we have to choose the color Image that we want to convert in to Black and White.
- Go to Adjustment Layer and Select the Black and white option as shown in Figure 1.
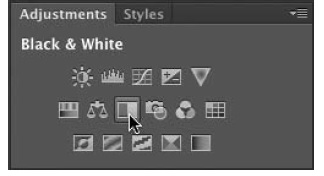
Figure 1: Black and White Option
- With the Black & White command window open it and then we click the icon in the Adjustments Panel that looks like a pointing finger as shown in Figure 2
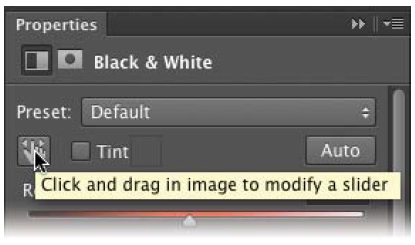
Figure 2: Properties Dialog Box
Under properties dialog box for Black and white box there are several parameters as shown in Figure 3.
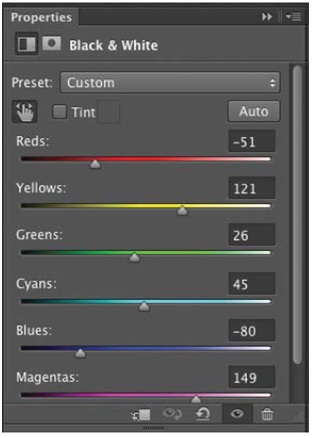
Figure 3: Parameters of Properties Dialog box
To convert a colour image to black and white we apply the setting for the following parameters as per application need.
- Choose a Preset
First of all we select a preset conversion. This may be a custom also that we saved previously from the pop-up menu it means we select a predefined grayscale mix or a previously saved Custom mix.
We click the properties menu () icon to save the custom mix and then select save Black & White Preset.
In an alternate method we can also use starting point to one of the preset and then we can adjust from there.
(b)Click Auto
Auto feature available in adobe Photoshop is used to analyze color values of the image and then it converts to grayscale while trying to increase gray tonal values.
As a starting point we can use this type of conversion. Here grayscale setting is performed by mixing the color values of the image. This mixing is also known as auto mix and it gives better results. Auto mix is also used to adjust gray values by the help of the color sliders.
(c) Tint: Tint is an important factor and used to apply a color tone. So for this purpose we have to enable Tint. At first we click at the color swatch to open the Color Picker and choose the tint color.
To create a duotone effect chooses the Tint option. If we want to change the tint color we click its swatch and use the Color Picker to select a new color that matches with application need.
(d)Adjust the sliders: We can adjust the sliders for different purpose. We want a darker tone then we drag the slider to left and drag the slider to right if we want light tones.
When we click or move the mouse over the image then mouse turns into an eyedropper. After this we click areas of the image to highlight that dominant color in dialog box.
(4) Once you are happy with your black and white transformation, save and share your results
While converting a color image to black and white image important point to remember following two points
- Normally expert recommends avoiding the Auto buttons, but with the Black & White adjustment layer it works well. It can be used to increase the distribution of gray values.
- Be sure to try out blending modes with your adjustment layers. The Black & White setting looks perfectly blended.
Conclusion and Summary
In this Photoshop tutorial we have discussed the following important points
- Introduction of Black and White Tool.
- Process used to make image black and white.
Next Photoshop Tutorial – How to Create a New Document in Adobe Photoshop ?
